 Save to Pinterest
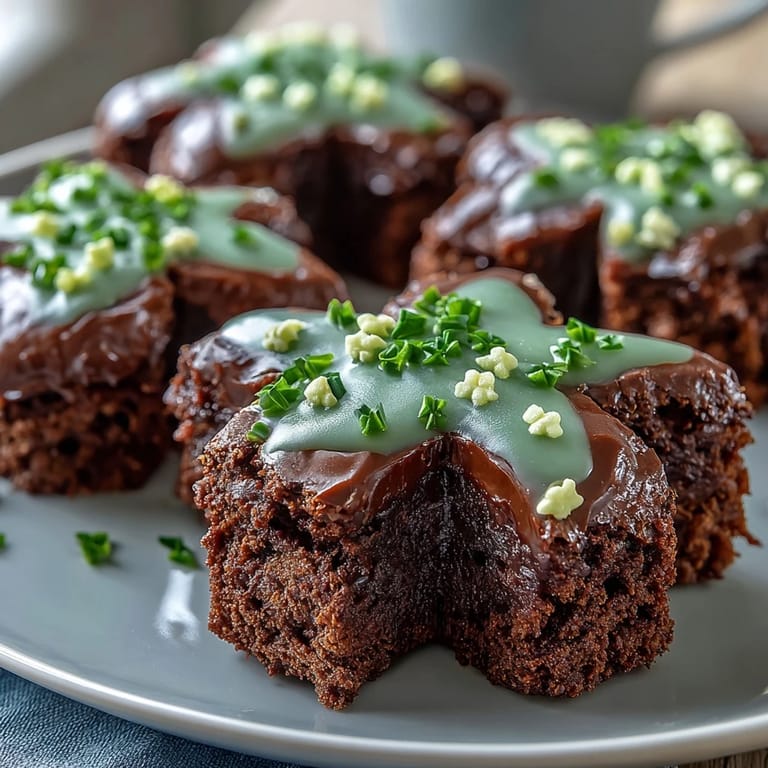
 My neighbor showed up at my door last March with a shamrock-shaped cookie cutter she'd found at a vintage market, insisting I had to make something festive with it. I'd never thought much about St. Patrick's Day desserts before, but watching her eyes light up when I pulled these emerald-topped brownies from the oven made the whole thing click. There's something about turning a simple chocolate square into something whimsical that reminds you why cooking matters.
I brought these to a St. Patrick's Day potluck where someone's aunt was absolutely convinced I'd bought them from a bakery. The look on her face when I admitted they were homemade, the shamrock shapes cut by hand, felt like winning a small kitchen trophy. That afternoon taught me that sometimes the simplest presentations create the biggest impressions.
Ingredients
- Unsalted butter: Using unsalted lets you control the salt level and keeps the brownie's chocolate flavor front and center rather than buried under seasoning.
- Granulated sugar: This is your main sweetener and helps create that fudgy texture, so don't swap it for brown sugar unless you want a chewier result.
- Large eggs: Room temperature eggs mix more smoothly and help create a uniform crumb, so pull them out of the fridge about twenty minutes before baking.
- Vanilla extract: A full teaspoon makes a real difference in rounding out the chocolate flavor without making the brownie taste like vanilla cake.
- Unsweetened cocoa powder: This is pure chocolate without added sugar, so it gives you deep flavor and that signature brownie darkness.
- All-purpose flour: Just enough to hold everything together without making these cakey, so resist the urge to add more if the batter looks loose.
- Salt and baking powder: The salt brightens the chocolate while baking powder gives you lift, creating that perfect fudgy-but-not-dense texture.
- Powdered sugar: This dissolves smoothly into the icing and gives you that creamy texture that spreads like a dream.
- Softened butter for icing: Softened, not melted, so it beats into the sugar and creates something silky rather than slick.
- Milk: Just enough to loosen the icing to spreading consistency, though you can use cream if you want it extra rich.
- Green food coloring: Add it drop by drop because one second you're pale green and the next you're practically lime, and there's no going backward.
Tired of Takeout? 🥡
Get 10 meals you can make faster than delivery arrives. Seriously.
One email. No spam. Unsubscribe anytime.
Instructions
- Prep your pan like you mean it:
- Preheat the oven to 350°F and line your 8x8-inch pan with parchment paper, letting the edges hang over the sides. This parchment overhang is your golden ticket to lifting these brownies out without them crumbling into the pan.
- Melt the butter slowly and let it cool just slightly:
- In a medium saucepan over low heat, melt the butter and remove it from heat before adding the sugar, eggs, and vanilla. You're building a smooth base here, not scrambling eggs, so take your time whisking until everything turns glossy.
- Fold in the dry ingredients with restraint:
- Add the cocoa powder, flour, salt, and baking powder and mix just until combined, maybe fifteen to twenty strokes with a spatula. Overmixing develops gluten and makes brownies tough, so stop as soon as you don't see flour streaks anymore.
- Pour and smooth:
- Pour the batter into your prepared pan and use a spatula to gently smooth the top so it bakes evenly. Don't press down hard or you'll compress the batter and lose that fudgy texture.
- Bake until just barely done:
- Bake for 25 to 30 minutes, checking at 25 with a toothpick inserted in the center. You want a few moist crumbs clinging to that toothpick, not wet batter and definitely not a clean stick.
- Cool completely before cutting:
- Let the brownies cool entirely in the pan on a wire rack, then in the fridge for at least an hour if you have time. Warm brownies tear apart when you cut them, so patience here means prettier shamrocks.
- Beat the icing until it's cloud-like:
- While the brownies cool, whip together powdered sugar, softened butter, milk, and vanilla until it's light and fluffy, about two minutes with an electric mixer. Add green food coloring drop by drop, stirring between additions until you reach a shade that makes you happy.
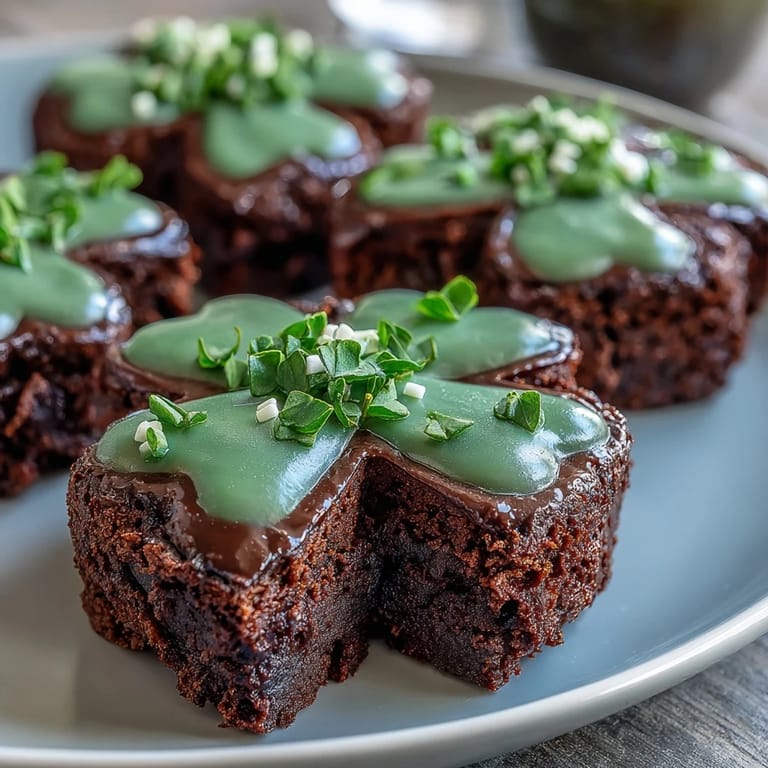
- Cut shamrocks with intention:
- Lift the cooled brownies from the pan using that parchment overhang and use your shamrock cutter to stamp out shapes, wiping the cutter clean between cuts. This keeps the edges sharp and keeps you from dragging cocoa crumbs into the next cut.
- Ice and decorate while the moment strikes:
- Spread a generous layer of green icing over each shamrock brownie and sprinkle with green sanding sugar if you're feeling festive. Let the icing set for a few minutes before serving so it doesn't smudge when someone picks one up.
 Save to Pinterest
 Last year a friend's kid asked if shamrocks were real or just made up for St. Patrick's Day, then immediately forgot the answer when I handed her one of these brownies. Watching her face get smudged with green icing and chocolate while she asked for another one reminded me that food doesn't need to be complicated to be memorable.
Making Them Picture Perfect
The secret to shamrocks that actually look like shamrocks is using a metal cookie cutter instead of plastic because it holds its shape better and cuts cleaner edges. I learned this after ruining my first batch with a flimsy plastic one that bent every time I pushed down. A quick wipe with a damp cloth between cuts keeps the edges from getting fuzzy with cocoa, so your finished brownies look intentional rather than homemade in a sloppy way.
Customizing the Flavor
If you want to get creative, fold mini chocolate chips or chopped nuts into the batter just before pouring it into the pan, or swirl a spoonful of peanut butter across the top before baking. I've also experimented with adding espresso powder to deepen the chocolate flavor, though that's for when you want these brownies to taste a little more sophisticated than festive. The beauty of this recipe is that it's forgiving enough to handle experiments without falling apart.
Storing and Serving Smart
These brownies live happily in an airtight container at room temperature for up to three days, so you can make them the day before your gathering without stress. I've found that they taste even better on day two because the flavors settle and the icing firms up just enough to make them feel more like a real dessert and less like you're eating directly from the pan. Keep them away from sunlight though because that green icing will start to fade if it sits in bright light for too long.
- Refrigerate if your kitchen runs warm or if you want the icing to set faster before serving.
- Bring them back to room temperature for about ten minutes before eating so the brownie flavor really shines.
- These freeze beautifully for up to two weeks if you need to get ahead for a party.
 Save to Pinterest
 These shamrock brownies have become the dessert I make when I want people to feel celebrated without fussing for hours. There's real comfort in something that tastes like chocolate indulgence but looks like you put serious thought into the presentation.
FAQs About This Recipe
- → What type of cocoa powder is best for these brownies?
Unsweetened cocoa powder works best to deliver a deep chocolate flavor without adding extra sweetness.
- → Can I use a different shape instead of shamrocks?
Yes, any cookie cutter shape can be used to customize the design to your preference.
- → How can I achieve the green color in the icing?
Adding a few drops of green food coloring to the icing mixture creates a vibrant green hue perfect for themed treats.
- → What’s the best way to store leftover brownies?
Store brownies in an airtight container at room temperature for up to three days to maintain freshness.
- → Can I add nuts or chocolate chips to the brownies?
Yes, folding in mini chocolate chips or chopped nuts adds texture and extra flavor to the fudgy brownies.